
Configuring the Institution and Its Libraries
Watch the Calendars video (6 min.).
機関には複数の図書館が含まれています。機関はキャンパスごとに編成できます(任意)。その場合、図書館をキャンパスに関連付けてから、キャンパスごとに特定のプロセスとリソースを制限します。For more information, see Organizational Topologies.To manage campuses, see Configuring Campuses.
図書館のインフラストラクチャには、物理的配架場所とサポートシステムのすべてが含まれます。これには、リソースの物理的配架場所(図書の棚/スタックやリモートストレージなど)、貸出・返却受付、マシンでのセルフチェック、プリンターが含まれます。
機関内またはキャンパス内の図書館は、ユーザーが別のロケーションでリソースをチェックインまたはチェックアウトしたり、アイテムを相互に送信したり、相互に代わってアイテムを取得(購入)したりできる関係を持つように設定できます。If a library is configured to do this for libraries at other institutions (and not only within the institution), it is known as a resource sharing library.
If you select ALL in the Library dropdown list when creating the relationship, this selection only applies at the time the relationship is created.
場合によっては、複数の独立した図書館が単一の機関として Alma で管理されます。This may occur, for example, when a geographic or political region includes a number of small or medium-sized libraries that benefit from sharing Alma management staff, or when a university contains multiple colleges that do not provide full library access to members of other colleges.「図書館の独立」という用語は、この期間構造を指します。機関に対して図書館の独立がオンになっている場合、ユーザーブロックや統計など、個々の図書館に関連する一部の情報は、機関に含まれる他の図書館から隠される可能性があります。For additional information, see Fulfillment Library Independence.
Ex Librisは、ユーザーと協力して、最初に機関の設定を行います。初期設定の後、図書館のインフラストラクチャについて、次のように要素の追加・編集が必要な場合があります。
図書館、キャンパス、プリンターの作成時には、任意の順序で設定を行い、1つのものを他のものに関連付けることができます。たとえば、a) 図書館を作成してからキャンパスを作成し、図書館をキャンパスに追加することもできますし、b) キャンパスを作成してから図書館を作成し、キャンパスを図書館に追加することもできます。
- 機関に関するグローバル情報を設定します。
- 機関名とオプションの説明を変更します。See Configuring General Institution Information.
- 新しい図書館を追加します。See Adding a Library.
- 住所、電話番号、Eメールアドレスなど、その機関のグローバルなコンタクト情報を変更します。See Configuring Institution/Library Contact Information.
- 機関のグローバルなカレンダー情報(開館・閉館時間や、それに影響し得る予定イベントなど)を更新します。See Configuring Institution/Library Open Hours.
- 機関でプリンターを設定します。See Configuring Printers.
- Configure the institution's integration with self-check machines (see Self-Check Machines), LDAP, a bursar system, a student information system, and other external systems.
- 各図書館の設定:
- 受入のためのデフォルトの物理的配架場所。
- 関連付けられたキャンパス。
- Its resolver proxy (see Resolver Proxies).
- 図書館のフルフィルメント情報:その図書館と他図書館との間のフルフィルメントサービス、その図書館がリソースシェア図書館かどうか、図書館の貸出・返却受付、セルフチェックマシンのゴミ箱のソートに関する情報。See Configuring Library Fulfillment Infrastructure.
- 住所、電話番号、Eメールアドレスなど、ローカルのコンタクト情報です。See Configuring Institution/Library Contact Information.
- ローカルカレンダー情報(開館・閉館時間や、それに影響し得る予定イベントなど)。See Configuring Institution/Library Open Hours.
- The IP ranges of the library, for managing access to electronic resources; see Configuring Distributed Access to Electronic Resources.
- 物理的配架場所(棚とリモートストレージ)、その場所にサービスを提供する貸出・返却受付を含む。See Configuring Physical Locations and Configuring Remote Storage Facilities.
- Configure for each campus (see Configuring Campuses):
- そのキャンパスに関連付けられた図書館です。
- Its resolver proxy (see Resolver Proxies).
- The IP ranges of the campus, for managing access to electronic resources; see Configuring Distributed Access to Electronic Resources.
- キャンパス名を機関で定義されている他の言語に翻訳します。
- ユーザーが機関全体でリソースを借入/返却できるようにし、ユーザー情報を共有する場合は、Ex Librisにフルフィルメントネットワークの設定を依頼してください。See Fulfillment Networks.
- To manage multiple institutions, see Managing Multiple Institutions Using a Network Zone.
ネットワークゾーンの設定に属している場合、ネットワークゾーン管理者は営業時間の設定(カレンダー、概要、連絡先、および IP 情報を含む)を管理し、カレンダー情報をメンバーに配信できます。This is done in the Consortia Central Configuration Dashboard in the Library Management section.For more information see Collaborative Network Sections and Configuration Options.
Configuring General Institution Information
- 一般システム管理者
You manage general information about institutions and libraries on the pages at Configuration Menu > General > Libraries > Add a Library or Edit Library Information.
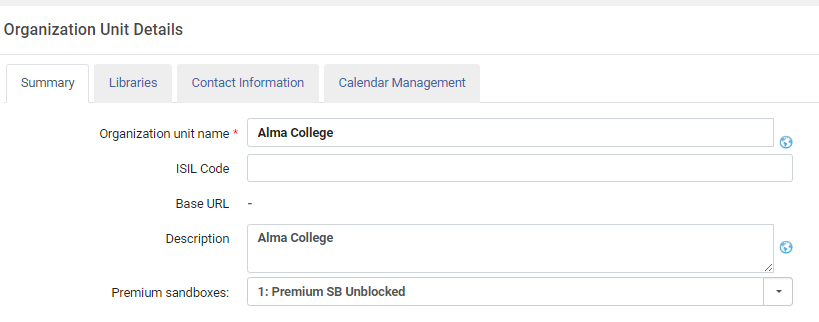
顧客コードと機関コードは、Ex Librisから割り当てられます。独自の図書館コードを設定します。
基本URLは、Ex Librisによって割り当てられた機関固有のドメイン名です。If you are not already using this domain name and want to start using it, see Configuring Alma and Primo to Use Your Institution-Specific Alma Domain.For general information on Alma domain names, see Your Alma Domain Names.
[組織単位の詳細]ページには、次のタブが含まれています。
- Summary (Organization Unit Details (Institution) page) – The general details of the institution.
- Libraries (List of Libraries page) – The details of the libraries in the institution.See Adding a Library and Editing a Library.
- Contact Information(Organization Unit Contact Information page) – The contact information for the institution, including physical addresses, phone numbers, and email addresses.See Managing Institution/Library Contact Information.
- Calendar Management (Calendar Management page) – Configure the hours during which the institution is open or closed.See Managing Institution/Library Open Hours.
機関の名前と説明を編集できます。
To update this information in Primo, see Configuring the Primo Institution.
To edit the institution's general details:
-
From the Summary tab on the Organization Unit Details (Institution) page (Configuration Menu > General > Libraries > Add a Library or Edit Library Information):
- 機関の名前(必須)と説明(任意)を変更します。
-
Enter your ISIL Code(optional).The ISIL code (International Standard Identifier for Libraries and Related Organizations) may be used to uniquely identify your location.
For example, if your institution is participating in SRU/SRW search requests and resource sharing, the ISIL code is used in the institution identifier tag that is sent in an SRU response (see Holdings Options (ISO 20775) on the SRU/SRW Search page for more information).
- この図書館が、他機関のためにその場所で受取/返却を受け入れる場合、[他機関へのサービス]を選択します。This field only appears if you have set up a fulfillment network; see Requesting an Item for Pickup Anywhere in the Network.
- [保存]を選択します。
- On the Organization Units Relations Setup (Institution) page (Configuration Menu > General > Libraries > Relationships), add the libraries for which the institution handles acquisitions (rather than the library making its own purchases).For more information, see Adding Library Relationships.
Adding and Configuring Libraries
- 一般システム管理者
You add libraries on the List of Libraries page (Configuration Menu > General > Libraries > Add a Library or Edit Library Information; select the Libraries tab).
新しい図書館は、部署、カレンダー情報、利用規約ポリシー、ワークオーダータイプの大部分など、いくつかの設定を機関から継承します。図書館は、オペレータを定義することなく、最初に、受入のための図書館固有のワークオーダータイプ(AcqWorkOrder)と、図書館固有の受入ワークオーダー部署によって設定されます。新しい図書館は、図書館固有のデフォルトの場所を1つ有しており、プリンターは定義されていません。この情報を設定するには、フルフィルメントおよび一般的な設定に関する他の領域を参照してください。
Any library that's added to Alma must also be properly defined for the Primo institution.Alma allows you to export the libraries to a file so that they can be imported into Primo.For details, see Viewing and Exporting the Alma Libraries.
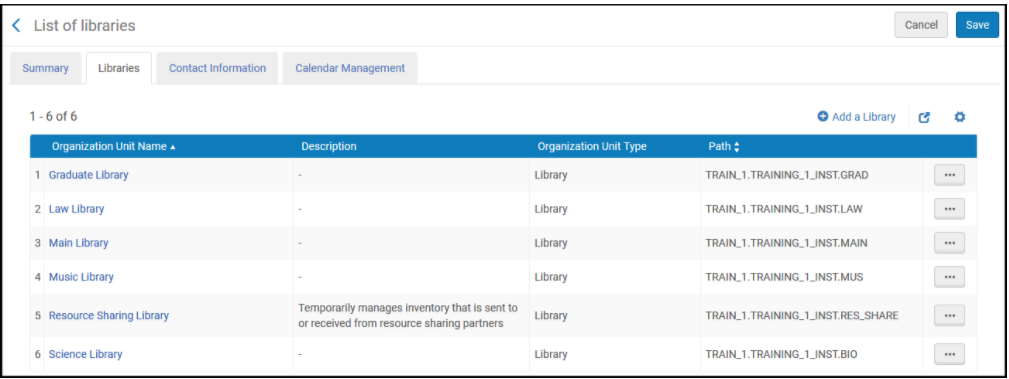
The organizational structure of the institution appears in the Path field in header and the organizational structure of each library appears in the Path column in the table.パスには、顧客コード、機関コード、および図書館コードが含まれます。たとえば、顧客コードがTRAIN_1の場合、機関コードはTRAIN_1_INSTです。図書館コードがGRADの場合、パスはTRAIN_1.TRAIN_1_INST.GRADです。
このページで、図書館を追加・編集・削除できます。For information on editing library information, see Editing a Library.
To add a library:
- [図書館のリスト]ページで、「図書館を追加」を選択します。[組織単位の追加]ページが表示されます。
- Enter an Organization unit name,code, and (optionally)description for the library.For information on the other fields, see Editing a Library.現時点では、これらのフィールドは無視してください。
- A library code must not contain special characters, such as quotes ('), nor blank spaces.Use alphanumeric characters, and use hyphens and underscores to fill in the blank spaces.
- 図書館コードを一度設定すると、編集することはできません。To change the library code, a new library with a new code will have to be created.
- [保存]を選択します。図書館が保存されます。
図書館の削除
ライブラリレベルの履行単位、場所、貸出カウンター、サービス単位、リクエスト、または物理的なアイテムが関連付けられている場合、または注文書(PO)、注文明細(POL)が関連付けられている場合は、図書館は削除できません。To view related requests, see Viewing Related Requests.
To find the components associated with the library in order to delete them:
- To find the POs and PO lines, perform an advanced search for Order lines, select the PO line owner, and then search for workflows and PO statuses:
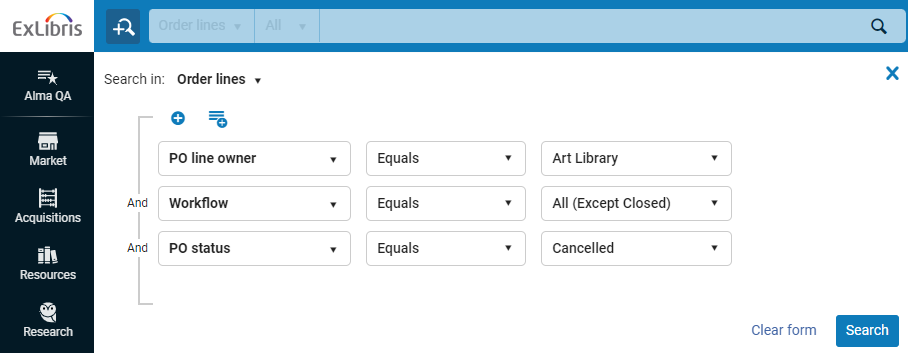 This enables you to see PO lines in whatever status you need to see them.This also enables you to see the POs with which these PO lines are associated (Alma does not have a specific search for POs).
- To find the circulation desks go to Configuration > Fulfillment > Circulation Desks.
- To find the fulfillment units make sure the "Configuring" scope is the library that is to be deleted, and go to Configuration > Fulfillment > Fulfillment Units.The fulfillment unit whose owner is Library should be removed.
- To find the service units (work order department) go to Configuration > General > Work Order Departments.
- To find the requests associated with a library or circulation desk see Viewing Related Requests.
- 関連する物的アイテムを見つけるには、詳細検索を実行し、図書館でフィルタリングすることができます。あるいは、「物理アイテム」サブジェクト領域で分析レポートを作成することもできます。
それでも関連項目が見つからない場合は、ユーザーサポートにお問い合わせください。
To delete a library:
- Once all the components associated with the library were deleted, select Delete in the row actions list for the library, and select Confirm in the confirmation dialog box.
If there are components associated with the specific library you are trying to delete, then an error message will display specifying which types of components (PO line, circulation desk, etc.) are still associated with the library.
図書館の編集
- 総合システム管理者
- フルフィルメント管理者
[組織単位の詳細(図書館)]ページで図書館を編集します。
- As a General System Administrator:Configuration Menu > General > Libraries > Add a Library or Edit Library Information; select the Libraries tab and select Edit in the row actions list.
- As a Fulfillment Administrator (or General System Administrator):Configuration Menu >(ensure that the library is selected in the Configuring drop-down list)> Fulfillment > Library Management > Library Details.
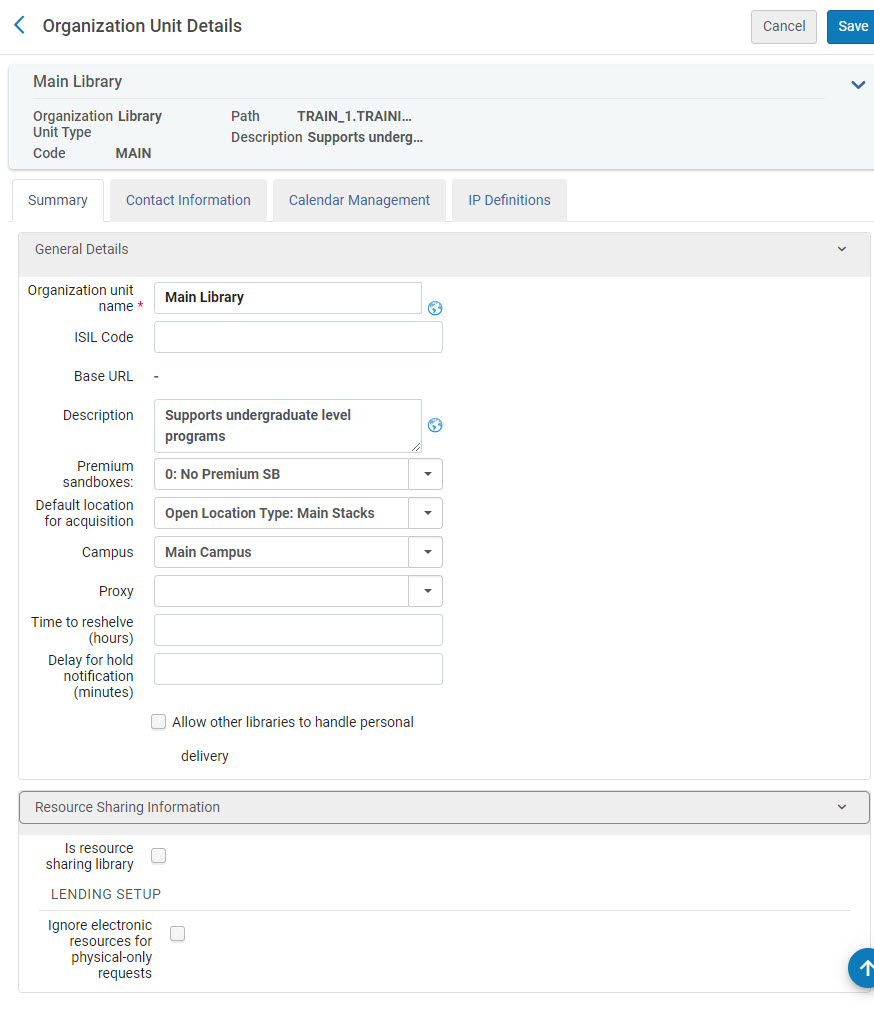
To edit a library:
- [組織単位の詳細(図書館)]ページで、必要に応じて図書館の機関の名前と説明を変更します。
- 場所のリストから[受入のためのデフォルトの場所]を選択します。これは、図書館について物理的な注文明細が作成された際にアイテム/所蔵が作成されるデフォルトの場所です。これが定義されていない場合、アイテム/所蔵は自動で作成されず、手動で追加する必要があります。
- 図書館を関連付ける[キャンパス]を選択します。See Managing Campuses.
- デフォルトのプロキシプロファイルを選択します。See Resolver Proxies.This proxy will be used if proxy was not defined on a service or a portfolio level.この場合、キャンパスが定義されていれば (前のフィールドを参照)、ここで選択したプロキシがこのキャンパスに適用されます。キャンパスが定義されていない場合、ここで選択されたプロキシは図書館全体に適用されます。
- Enter the Time to reshelve (hours) which indicates the period of time (in hours or portions of hours, such as 10.5) that the item is considered as available, but shows as being reshelved in Alma and Primo so patrons and librarians know not to search for it on the shelf.この図書館レベルのパラメータは、貸出・返却受付固有の値によって上書きされる場合があります。
アイテムを棚に戻す時間の動画(2分07秒)を参照してください。
- Enter the Delay for hold notification (minutes) to define how long Alma waits before sending a hold notification to a patron.遅延は最大3桁まで入力可能で、0は遅延がないことを示します。When the delay is complete, Alma checks to see if the request is still active and if so, sends the hold notification to the patron.貸出・返却受付と図書館の両方に値が入力されている場合、貸出・返却受付の値が使用されます。
- Select Allow other libraries to handle personal delivery to allow other libraries to handle personal delivery for that library's items.これは、スキャンイン図書館が個別配送を処理する機能を考慮に入れます(個別配送をサポートするプライマリ貸出・返却受付を備えています)。
For more information, see Supports personal delivery on the Configuring Circulation Desks page.
- To configure the library as a resource sharing library, see Configuring Parameters of a Resource Sharing Library.
- 機関が、代替的・一時的なアイテムレベルの請求記号を作成するために、冊子アイテムの編集ページで計算を使用するよう設定されている場合、[アイテム請求記号の計算を無効にする]フィールドが表示されます。図書館レベルの接頭語の一致を制限するには、このフィールドを選択します。これを選択すると、機関レベルの接頭語/設定に基づいて請求記号の計算が行われます。See Updating Item-Level Information for more information.
- 完了したら[保存]を選択します。
追加の図書館設定オプションについては、このページの他のセクションを参照してください。
Viewing Related Requests
図書館に関連するリクエスト、つまり図書館が目的地(受け取り場所または移動リクエストの目的地)であるリクエストを表示できます。This is useful for example when deleting a library where you first need to handle the related requests.
To view the related requests for a library:
- Navigate to Configuration > General > Add a Library or Edit Library Information.
- 図書館タブを選択します。
- From the row actions menu for a library select Display related requests.
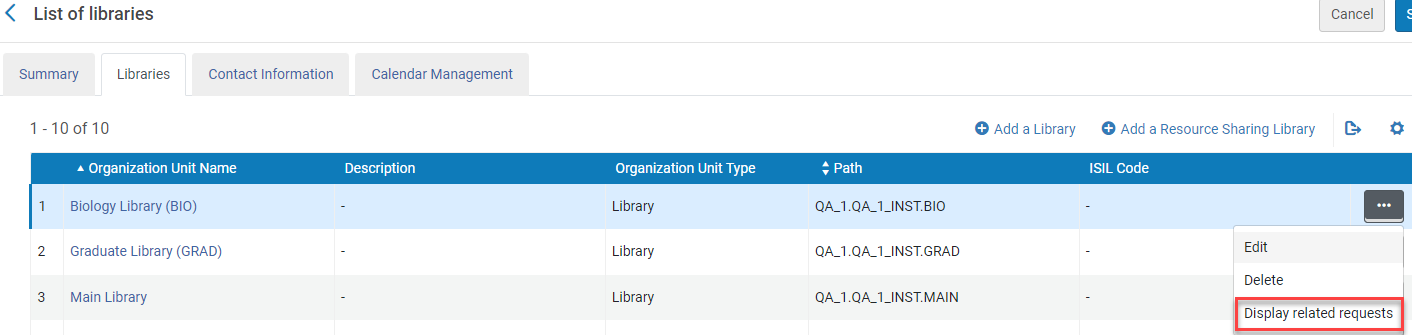
- 関連するリクエストのリストが表示されます。
Configuring IP Ranges for a Library
- 総合システム管理者
- フルフィルメント管理者
[IPの定義(図書館)]ページで、図書館のIPレンジを設定します。
- As a General System Administrator:Configuration Menu > General > Libraries > Add a Library or Edit Library Information; select the Libraries tab, select Edit in the row actions list and select the IP Definitions tab.
- As a Fulfillment Administrator (or General System Administrator):Configuration Menu >(ensure that the library is selected in the Configuring drop-down list)> General > Library Management > Library Details; select the IP Definitions tab
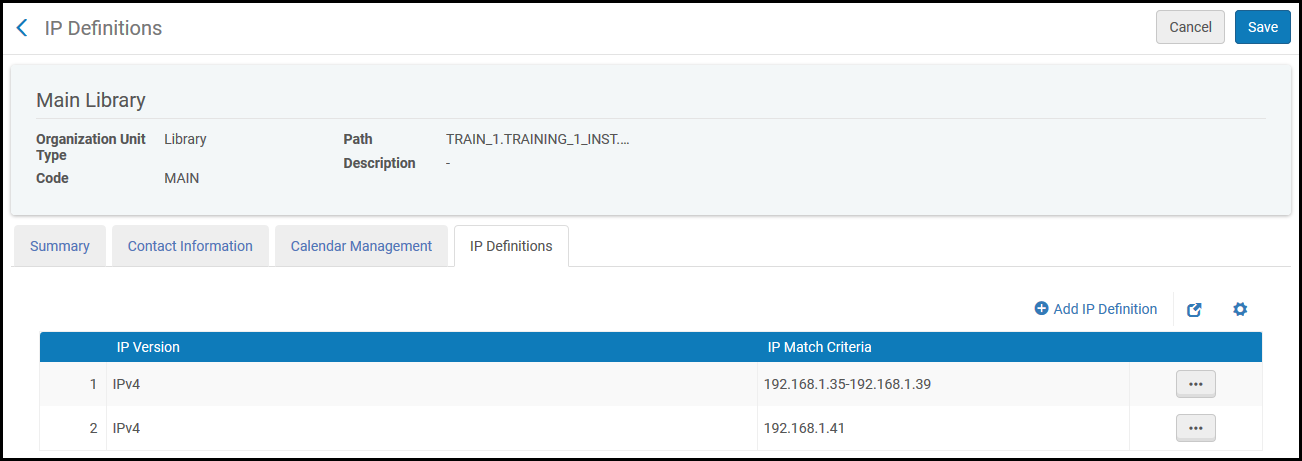
The IP ranges identify a patron's location when considering resource availability and when holdings by location in a Locations Ordering Profile (see Configuring the Order of Primo Search Results).If the library is associated with a campus, the IP ranges must fall within the IP ranges of the campus; see Editing a Campus.
See Configuring Distributed Access to Electronic Resources.
IPレンジが定義されていない場合、「図書館にはIPの定義がありません」という警告メッセージが表示されます。
To add an IP address range to a library:
- [IPの定義]ページで、「IPの定義を追加」を選択します。[IPの定義の追加]ダイアログボックスが表示されます。
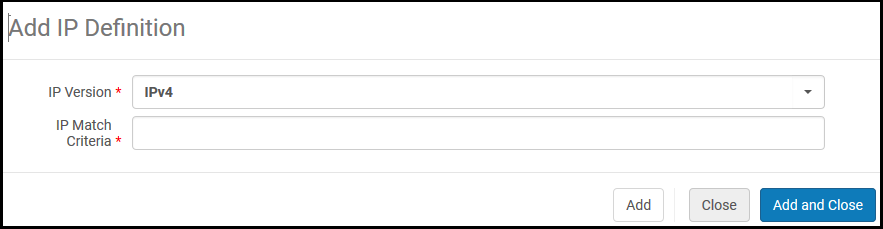
- Select an IP Version from the drop-down list and enter the matching IP address,IPv4 or IPv6.
- In IP Match Criteria, enter the IP range or a single IP address.For example, for an IPv4 range use decimal format A.B.C.D-A.B.C.D, such as 192.1.1.1-192.255.255.255.An example of an IPv6 range could be 2610:0:50f2::1-2610:0:50f2:ffff:ffff:ffff:ffff:ffff.
- 追加して閉じるを選択します。新しいIPレンジが保存されます。
You can configure groups with which library resources are associated; see Configuring Distributed Access to Electronic Resources.You can restrict resources by library or campus on the Electronic Service Editor page; see Adding a Local Electronic Collection.
Configuring Institution/Library Contact Information
- 一般システム管理者(機関のみ)
機関や図書館のコンタクト情報は、[組織単位のコンタクト情報]ページで設定します。
- As a General System Administrator (institution):Configuration Menu > General > Libraries > Add a Library or Edit Library Information; select the Contact Information tab.
- As a General System Administrator (library):Configuration Menu > General > Libraries > Add a Library or Edit Library Information; select the Libraries tab, select Edit in the row actions list and select the Contact Information tab.
- As a General System Administrator (library):Configuration Menu >(ensure that the library is selected in the Configuring drop-down list)> Fulfillment > Library Management > Library Details; select the Contact Information tab.
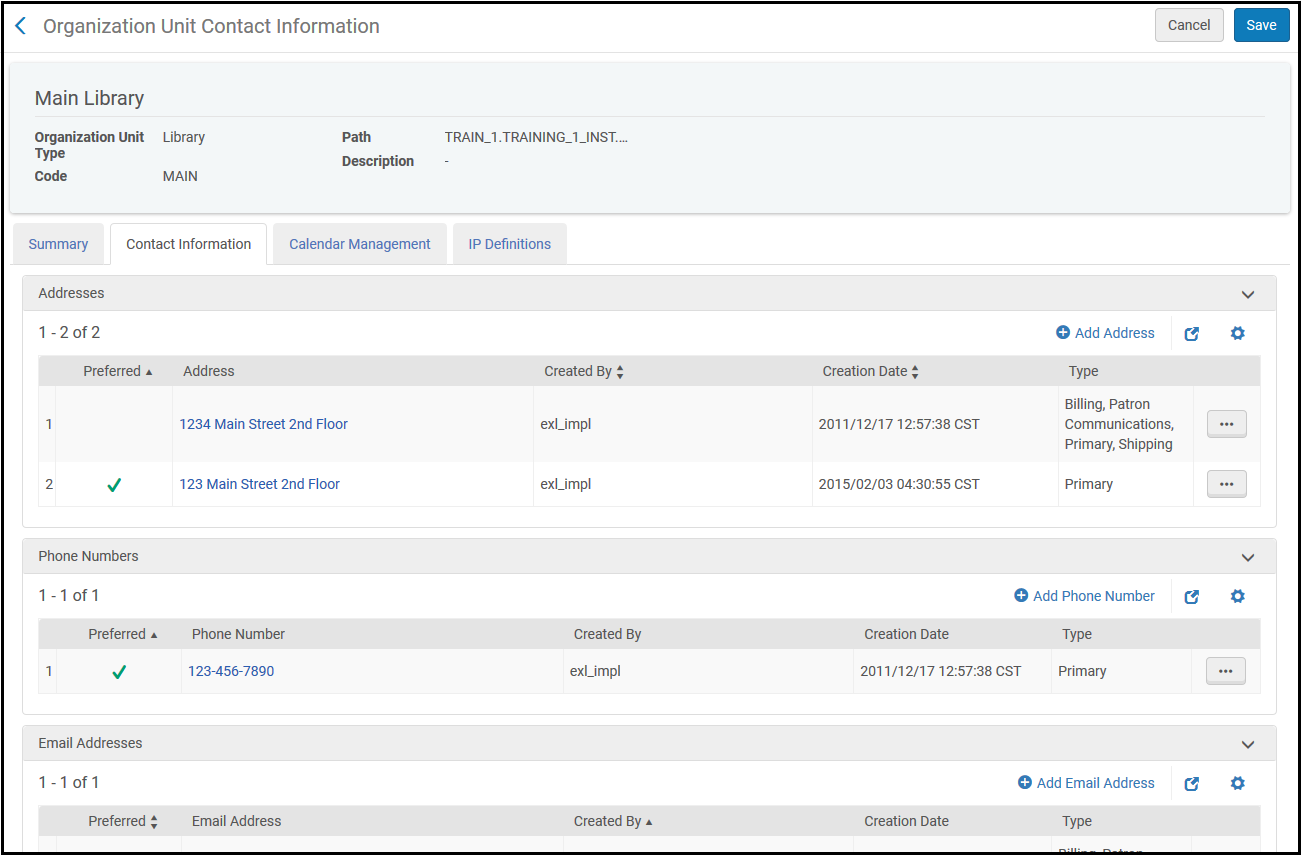
住所、電話番号、およびEメールアドレスを追加・編集・複製・削除できます。The contact information for libraries and institutions is the same as it is for users (see Managing User Contact Information).
To add contact information for a library or institution:
- Select Add Address,Add Phone Number, or Add Email Address.選択に応じた[追加]ダイアログボックスが表示されます。
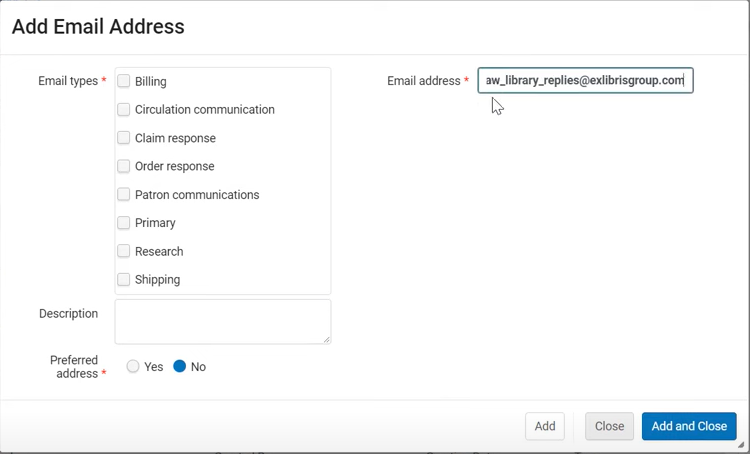
- 必要に応じてコンタクト情報を入力します。必須とマークされたフィールドを入力する必要があります。
- The address and email types are for informational purposes only, except in the cases listed below.
The Primary email address of the institution is used for Crossref authentication.Eメールアドレスのみを含め、「<」などの特殊文字は含めないでください。
Address Type Description 発送 送付先アドレスタイプは、ISO対応のリソースシェア図書館では必須です。ISOリクエストが送付される際、リクエストを送付すべき住所として、送付先の住所が含まれます。貸出機関は、デジタルで送付する場合、このアドレスに送付します。BLDSS APIを介して取寄せリソースシェアリクエストを送信する際にも、送付先住所タイプが使用されます。送付時、Almaはまず送付先住所タイプを検索します。見つからない場合は、優先住所が使用されます。 クレームへの回答 ベンダーにクレーム通知をEメールで送信する際、組織単位(所有図書館)にクレームへの回答のEメールタイプがあれば 、このEメールがクレーム通知EメールのFromアドレスで使用されます。For detailed information, see Communicating with Vendors. Order Response ベンダーに注文書をEメールで送信する際、組織単位(所有図書館)にオーダーへの回答のEメールタイプがあれば、このEメールがクレーム通知EメールのFromアドレスで使用されます。For detailed information, see Communicating with Vendors. リサーチ If you are using Esploro (see Esploro Overview), the address / phone / email type Research is available.EsploroによるEsploro関連のコミュニケーションにこの入力内容を使用させるには、このタイプを選択します。定義されていない場合、優先住所としてマークされた住所が使用されます。 Circulation communication このオプションは、「From」アドレスをユーザーに表示し、ユーザーが返信できるようにする場合に選択します。選択した場合は、目的のメールアドレスと説明を入力してください。
For a list of affected letters for the Reply to functionality, see Patron Notifications.
これにより、機関の各種の図書館の個別の「From」アドレスを示すこともできます。If the circulation communication email is not indicated for the library, the circulation communication email indicated for the institution is taken.
The library address is used only if the letter is a library letter (such as hold shelf notification) or an aggregated letter (such as Borrowing Activity Letter) that is split into library letters because of the separate_patron_notifications_by_library parameter being set to ‘true'.それ以外の場合は、所属機関の住所が使用されます(存在する場合)。See also Configuring Fulfillment Jobs.
If this option is not selected, the 'From' address is based on the address "From" label configured for the specific letter.
「図書館専用レター用Eメールアドレスへの「返信」の追加」の動画(1分45秒)をご覧ください。
- The address and email types are for informational purposes only, except in the cases listed below.
- [保存]を選択します。
情報を編集するには、その行のアクションリストで[編集]を選択し、情報を追加するための手順に従ってください。
情報を削除するには、その行のアクションリストで[編集]を選択し、確認ダイアログボックスで[確認]を選択します。
情報を編集または削除しても、その情報が既に含まれているAlmaの設定には影響しません。
Configuring Institution/Library Open Hours
- 総合システム管理者
- フルフィルメント管理者(図書館のみ)
さらに、Ex Librisは、次の役職について、図書館のカレンダー情報を設定可能にできます(設定可能にするには、Ex Librisのサポートにお問い合わせください)。
- 貸出・返却受付マネージャー
- 貸出・返却受付オペレータ
- 貸出・返却受付オペレータ(限定)
- リクエストオペレータ
カレンダー管理ページで機関や図書館の開館・閉館時間を設定します。
- As a General System Administrator (institution):Configuration Menu > General > Libraries > Add a Library or Edit Library Information; select the Calendar Management tab.
- As a General System Administrator (library):Configuration Menu > General > Libraries > Add a Library or Edit Library Information; select the Libraries tab, select Edit in the row actions list and select the Calendar Management tab.
- As any of the roles listed above (library):Configuration Menu >(ensure that the library is selected in the Configuring drop-down list)> Fulfillment > Library Management > Opening Hours.
For some roles enabled by Ex Libris to configure calendar information, this operation can be found under Fulfillment > Advanced Tools > Opening Hours, and not via the Configuration Menu.
Note that the below areas in Alma (among others) may be influenced by the open hours (depending on the policies configured):
- 返却期限日
- 罰金の計算
- 延滞ブロック
- 予約時間
- 延滞および紛失貸出プロファイル
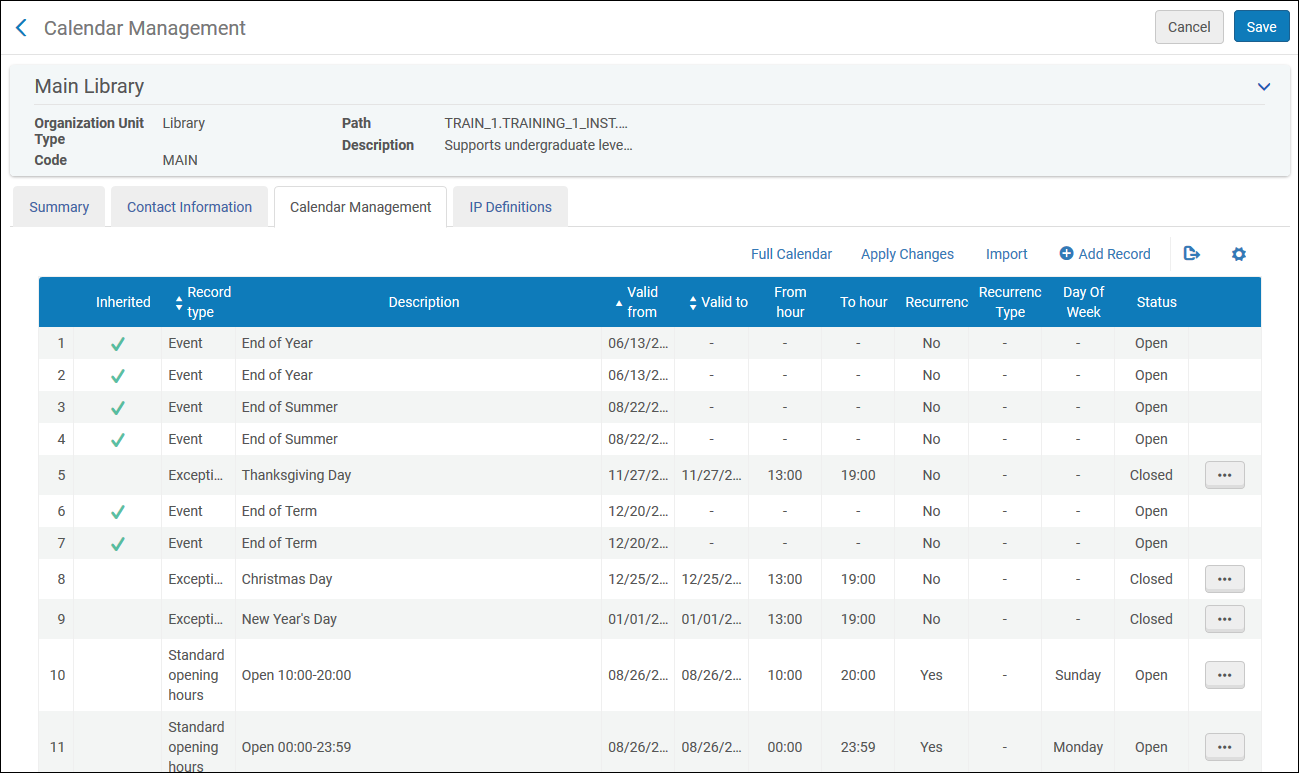
図書館は、機関からイベントと例外を継承します。図書館も各機関の開館時間を引き継ぎます。Alma は図書館と機関から時間を受け取り、最も早い開館時間と最も遅い閉館時間を適用することに注意してください。
When you make changes on this page, the changes are applied when the Apply Calendar Changes job runs; see Viewing Running Jobs and Viewing Completed Jobs.
- Almaは、将来の日付の図書館の営業時間を事前に変更することをサポートしていません。
- 図書館の開館・閉館時間は、貸出の期日に影響します。期日は、実際の図書館の開館・閉館時間と一致する必要はありません。たとえば、Almaでは、図書館の閉館時間(貸出に関して)を、実際にはそれより遅く閉館するとしても午後6:00に設定できます。
- After changing calendar information, loan due back dates might change; see the Loans – Due Date Correction after Calendar Change job in Viewing Scheduled Jobs.
- If you configured overdue fine policies that take open days into account (Unit of measurement is either Open Days,Exact Open Days, or Open Hours), changing a library's open/closed hours may affect fines that accrue for overdue items.
- 月の最終日は常に空欄で表示され、図書館の開館時間は表示されません。
To add calendar hours to a library or institution:
- [カレンダーの管理]ページで、[レコードを追加]を選択します。[レコードを追加]ダイアログボックスが表示されます。特に記載がない限り、すべてのフィールドは必須です。
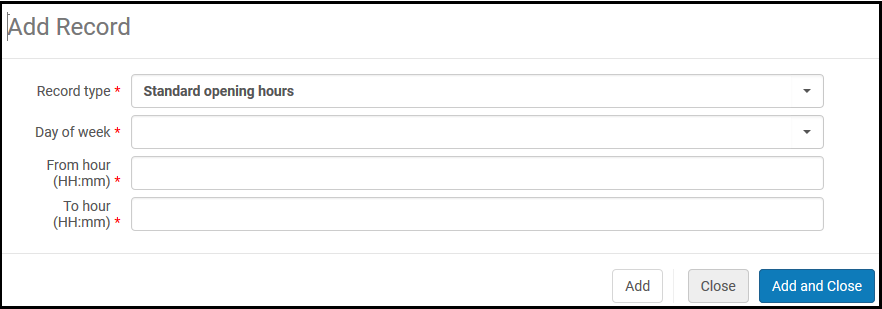
- [レコードタイプ]で、追加する開館時間のタイプを選択します。
- イベント – 年末、学期末、展示会などの特別な日。機関のイベントは図書館のカレンダーに表示されますが、図書館が開館しているか閉館しているかは表示されません。
- 例外 – 休日など、開館/閉館日時の例外。
- 通常開館時間 – 曜日に基づいて機関や図書館が開いている通常の日時。
1つの期間について定義できる通常開館時間は1つだけです。休日など、特定の日に別の開館時間を定義するには、例外レコードを定義します。たとえば、通常の月曜日だと図書館は9:00〜19:00に開いているが、7月の第1月曜日が祝日で、その日は12:00〜17:00しか開いていない場合、この祝日には2つの例外レコードを定義します。1つは9:00~12:00であり、もう1つは17:00~19:00です。
- 次の詳細を入力します。
- イベント:
- そのイベントが繰り返し発生するかどうか。繰り返し発生するなら、a) 繰り返しのタイプ(毎週か毎年。毎週ならどの曜日か)と、b) レコードが無効になる日付。
- 曜日 – 繰り返し発生するイベントの場合のみ(必須)
- 説明
- 日付と時間(時間は任意入力です)
- 例外:
- 図書館が通常の時間外に開館・閉館する例外があるかどうか。
- 曜日(任意入力)
- 説明(任意入力)
- 例外が有効な日付
- 例外が適用される時間
- 通常開館時間(図書館が開いていることを示す):
- 曜日
- 時間
通常開館時間の[有効期限]の日付を延長するには、レコードを編集し、変更を加えずに[保存]を選択します。[有効期限]の日付は、現在の日付に3年を加えた日付に自動で設定されます。[有効期限開始日]の日付は、現在の日付に自動で設定されます。
- イベント:
- [追加して閉じる]を選択します。
- 変更を適用するには、[変更を適用]を選択します。Almaは、[カレンダーの変更を適用]ジョブを実行します。
- すべてのレコードを保存するには、[保存]を選択します。
このページではレコードに関する次のアクションを実行できます。
- レコードを編集するには、その行のアクションリストで[編集]を選択し、レコードを追加するための手順に従ってください。
- Excelスプレッドシートからカレンダーをインポートするには、[インポート]を選択します。ファイルを選び、[アップロードして行をインポート]を選択します。You can also efficiently update library opening hours by exporting the Opening Hours calendar to an Excel sheet, making the changes, and then re-importing the file.Note that in this case, the export includes all lines, including the lines with information inherited from the institution, but when importing the Excel back, the inherited lines are ignored.このようにすると、機関から継承された情報は変更されません。また、Excel からのインポートでは既存のカレンダーの日付が完全に上書きされることに注意してください。
詳細については、「Excelのインポートを介して図書館の開館時間をアップデートする」ビデオ(3分20秒)をご覧ください。
Standard opening hours are automatically appliedfrom the current date (‘from' date) to the current date + 3 years (‘to' date), with the option to set exceptions solely for future dates; past dates cannot be updated, but future dates can be set.
- カレンダー形式でイベントと時間を表示するには、[フルカレンダー]を選択します。カレンダーが表示されます。特定の日・週・月を表示するには、左側の小さなカレンダーを選択します。カレンダーに、イベントと閉館時間が強調表示されます。カレンダーを閉じるには[戻る]を選択します。
- レコードを削除するには、その行のアクションリストで[編集]を選択し、確認ダイアログボックスで[確認]を選択します。
Configuring Campuses
- 総合システム管理者
図書館はキャンパスに関連付けることができ、個々の図書館ではなくキャンパスに従ってサービスを管理できます。
図書館の場合と同様に、キャンパスのIPレンジを定義します。This is used to identify the user's current location when considering resource availability and when configuring holdings by location in a Locations Ordering Profile (see Configuring the Order of Primo Search Results).
You can translate Campus names to the languages defined in your system.The translated campus names subsequently appear in Alma and in Primo VE, for example in the pickup locations list, in Get It Request Form, and more, if you choose to display Primo VE in the interface language to which campus names were translated.
You configure campuses on the Campus List page (Configuration Menu > General > Libraries > Define Campuses).
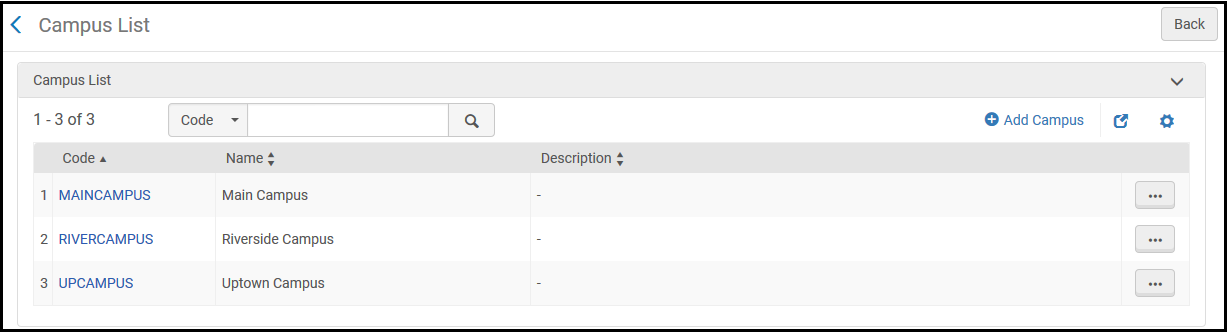
キャンパスの追加
キャンパスを追加したら、キャンパスを編集して、図書館やIPレンジに関連付けることができます。See Editing a Campus.
To add a new campus:
- On the Campus List page (Configuration Menu > General > Libraries > Define Campuses), select Add Campus.[キャンパスを追加]ダイアログボックスが表示されます。
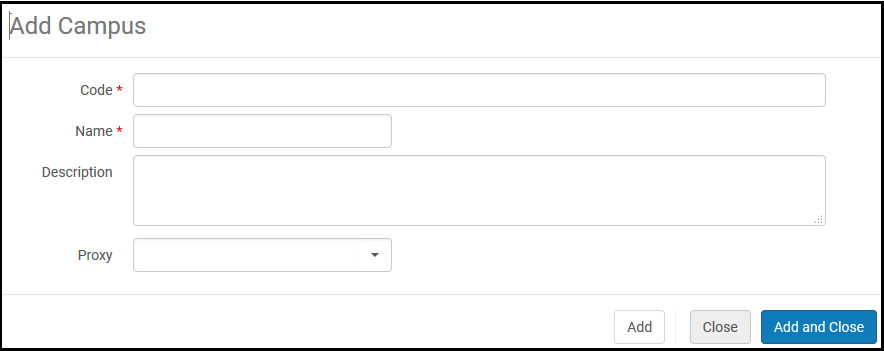
- [コード]フィールドに、キャンパスコードを入力します。
- [名前]フィールドに、キャンパス名を入力します。
キャンパスの名称に引用符(')などの特殊文字を含めることはできません。英数字、ハイフン、アンダーバーを使用します。
- 任意で、[説明]フィールドにキャンパスの説明を入力します。
- In the Proxy field, select a proxy (see Resolver Proxies).
- 新しいキャンパスを追加するには、[追加して閉じる]を選択します。
Editing a Campus
キャンパスの詳細、関連付けられた図書館、およびIPレンジを編集できます。
To edit a campus:
- On the Campus List page (Configuration Menu > General > Libraries > Define Campuses), select Edit in the row actions list for the campus record.[キャンパス]ページが表示されます。
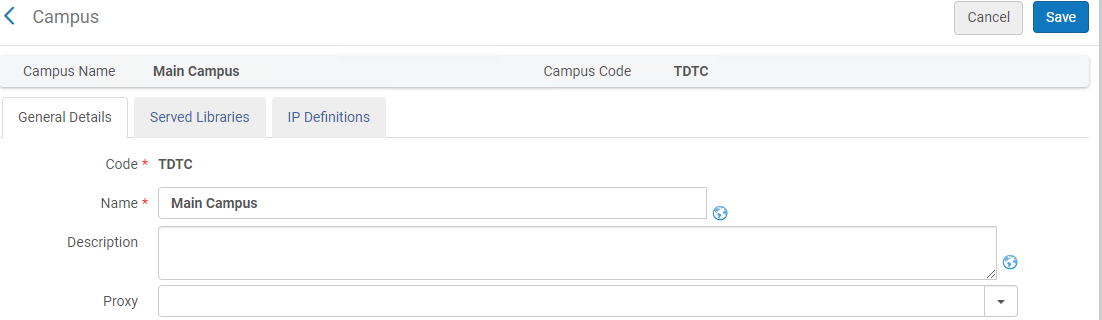
- In the General Details tab, edit the campus information, as required.For details on these fields, see Adding a Campus.To translate campus name and description to other languages, select the
 icon.
- [サービス図書館]タブ([サービス図書館]ページ)で、キャンパスに図書館をアタッチ・削除します。
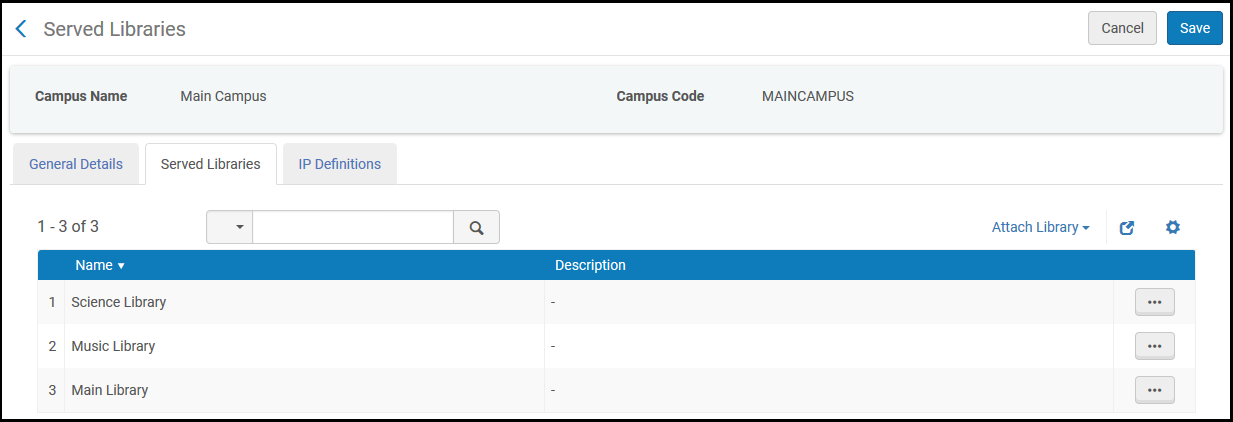
- 図書館をキャンパスにアタッチするには、[図書館をアタッチ]を選択し、図書館を選んで、[アタッチ]を選択します。You can also attach a library to a campus when editing the library; see Editing a Library.
図書館は1つのキャンパスにのみ関連付けることができます。
- 図書館を削除するには、その行のアクションリストで[削除]を選択し、確認ダイアログボックスで[確認]を選択します。
- 図書館をキャンパスにアタッチするには、[図書館をアタッチ]を選択し、図書館を選んで、[アタッチ]を選択します。You can also attach a library to a campus when editing the library; see Editing a Library.
- [IPの定義]タブで、キャンパスに関連付けられているワークステーションを識別するIPレンジを設定します。The IP range of a campus must include all libraries associated with the campus; see Configuring IP Definitions for a Library.
You can configure groups with which campus resources are associated; see Configuring Distributed Access to Electronic Resources.You can restrict resources by library or campus on the Electronic Service Editor page; see Adding a Local Electronic Collection.
- [保存]を選択します。
