ID Card
The ID Card product integration allows students to present their university ID card from a mobile device.
Overview
The ID Card product integration enables students to present their university ID cards from a mobile device. The barcode can be generated by the app (a range of barcode schemes are supported, including QR codes) or provided as an image by the vendor.
The CODE39 barcode scheme only supports numbers and uppercase letters; lowercase letters are not supported. (This is a limitation of the CODE39 scheme, not of the campusM system. Note that the CODE128 barcode scheme does support lowercase letters.) The campusM legacy systems circumvented this limitation, but React Native does not. On the React Native platform, if you are using CODE39, and a barcode contains a lowercase letter, the barcode is not displayed in the ID card.
Once an ID card is incorporated into the campusM app, the end-user can easily add it to their digital wallet (currently only Apple Wallet for iPhones is supported), making it even easier and more convenient for them to locate it when they need it.
Vendors
User Experience
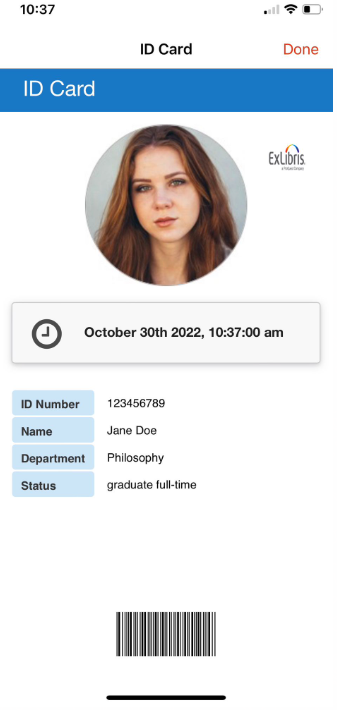
When the ID Card product integration is enabled in the app, students can present their ID cards from their mobile devices. The ID Card page can include the student's picture and other information, such as their ID number, name, department, barcode, username, and email, as configured by the university.
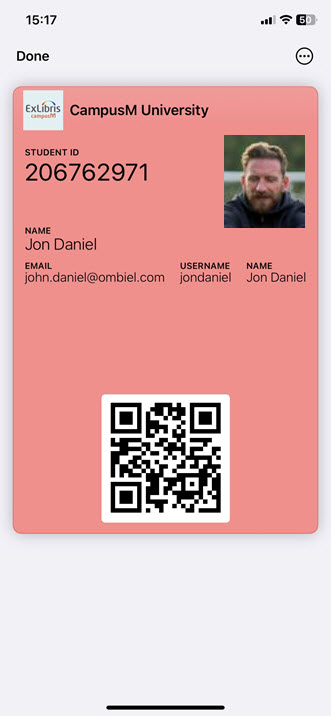
If the option to add the ID card to a digital wallet is enabled by the university, students can also present their ID cards from their digital wallets. In the digital wallets, the ID cards have both a front and a back; the user taps the card to switch between them.
User Activities
Students can use the ID Card in the app to present their university ID card whenever they would otherwise use their physical ID card.
User Workflow
The user can either select the ID Card tile to display the ID Card page or, if they add the ID card to their digital wallet, they can access it from there. Adding the ID card to the digital wallet is simply a matter of selecting an Add button in the ID Card page.
Authentication
There is no need for additional user authentication besides the API authentication.
Offline Support
Once the student's ID card is set up, its data is stored on the user ’s device. While internet access is required in order to log into the app, when the user is logged in, if they then go offline, they can still access their ID card through the app.
Screenshots
The following are examples of the ID Card page in the app and an ID card that was added by the app to Apple Wallet:
|
|
|
ID Card Page in the App when Time > Display Is Enabled
|
ID Card in Apple Wallet (Front)
|
Technical Overview
The following section describes technical information for the ID Card product integration.
Prerequisites
The following prerequisites are required for the ID Card product integration.
RESTful API Vendor
- User ID
- ID card data should be sent based on the userID from IDP so userID must be mapped in the customer ’s system.
- The CMAuth userID(which is returned by a response from either SAML, OAuth or LDAP as one of the IDP attributes) must be mapped in the CMAuth integration profile (‘Additional Mappings ’). Otherwise,userID must be returned by a response as one of the LDAP attributes.
- This attribute needs to be added as a path or query parameter.
- The parameter can be named userID or any other name.
- API info
- Required Format – JSON
- Request
https://{HOST}/UserApi/api/users/getIDcard?userid={userID}
- Response examples:
- The following is an example of a valid response if the barcode is provided by the API:
{
"pageTitle": "Testing Header", "studentID": "345678901", "name": "Jane Doe", "picture": "https://...exampleImage.png", "department": "Computer Science", "status": "Full-Time Undergraduate", "valid_until": "31-Dec-2023", "barcode": "https://...exampleBarcode.png"
}
- The following is an example of a valid response if the barcode is generated by the App
{
"pageTitle": "Testing Header", "studentID": "345678901", "name": "Jane Doe", "picture": "https://...exampleImage.png", "department": "Computer Science", "status": "Full-Time Undergraduate", "valid_until": "31-Dec-2023"
}
- The following is an example of a valid response with the image data as a Base64 encoded string representation of the image
{
"pageTitle": "Example page", "studentID": "12345", "name": "John Smith", "picture": "data:image/png;base64,/9j/4AAQLONGBASESIXTYFOURENCODEDSTRINGKoD/2Q==", "department": "Computer Science", "status": "Active", "valid_until": "29-Aug-2023"
}
- The page title can be any information the user would like to present at the top of the page (for example, static text, user name, user ID).
- If the response is empty, the user gets an error message:Unable to reach the service at this time. Please try again later.
- If one of the requested fields returns empty, it is either not displayed or displayed empty (for example Dept:), depending on the configuration (see ID Cards > Display Empty Fields options).
- The recommended size for a barcode image is 480 px * 60 px.
- The following is an example of a valid response if the barcode is provided by the API:
| External Field Name | Internal App Field Name | Description | Mandatory Yes/No | Data Type | Default | Example |
|---|---|---|---|---|---|---|
| Picture | picture | Picture of the user | No | String | https://...exampleImage.png | |
| ID Number | studentID | Student ID number (if you configure the app to generate the barcode, ID number is required, and this must be a valid input for the barcode scheme) | Yes, if the app is generating the barcode | string | 12345678 | |
| Page Title | pageTitle | Information to be presented at the head of the page | No | string | Student ID Card |
IdP Details Vendor
The token based authentication attributes must be mapped in the Integration Profile (Username Mapping, Mail Mapping, First Name Mapping, Last Name Mapping, and Additional Mappings). For more information, see Configuring Integration Profiles.
The IdP Details vendor automatically tries to take the username, email, and name attributes from the authentication token. Therefore, the token based authentication attributes must be mapped in the integration profile (Username Mapping, Mail Mapping, First Name Mapping, Last Name Mapping, and Additional Mappings). For more information, see Configuring Integration Profiles.
Additional attributes from the Additional Mappings section of the integration profile can be mapped in the Custom Fields section of the ID Card product integration.
ID Number can be configured to return the username attribute or any of the mapped attributes. Note that this field is used to generate the barcode.
Alma ILS Vendor
The IDP returns the Alma ID attribute. The Alma ID attribute is a unique ID controlled by the customer that is defined per student and staff member in Alma. If you are using CMAuth, this attribute can have any name in the IDP attributes response (from SAML/OAuth/LDAP) but needs to be mapped in the Additional Mappings section of the CMAuth integration profile. If you are not using CMAuth, the Alma ID attribute must be returned in the LDAP attributes response. The attribute is configured in the User Input Identifier field in the Alma Configuration section of the App Manager configuration.
The new mapping of the authentication token requires users to log out and log in to the app.
The Alma API key requires read access.
The image file server that serves the user's picture (if any) must be either accessible publicly or added to allowed lists as per campusM guidelines.
PeopleSoft Vendor
The IDP returns the end user's PeopleSoft ID attribute. In CMAuth, this attribute can have any name in the IDP attributes response (from SAML/OAuth/LDAP) but needs to be mapped in the Additional Mappings section of the CMAuth integration profile. The attribute is configured in the User Input Identifier field in the PeopleSoft API Configuration section of the App Manager configuration.
The new mapping of the authentication token requires users to log out and log in to the app.
Configuration
To configure the GET ID Card product integration, select Add Product Integration from the Product Integrations main menu option.
Select ID Card and the configuration page appears. The following table describes the configuration options available on this page.
| Configuration Option | Description | Mandatory | Data Type | Default | Example |
|---|---|---|---|---|---|
| Manage Integration | |||||
| Enable Product Integration | Select to enable the product integration on the user's app. | No | Checkbox | Unselected | |
| Product Integration Description | A description of the product integration for internal use | Yes | String | ||
| Screen Title | The title that appears in the top header of the service | No | String | ID Card | |
| Vendor | |||||
| Vendor Name | Defines to which vendor the integration connects. The ID Card product integration is currently supported by the RESTful API and IdP Details vendors. | Yes | Drop-down list | RESTful API | |
| RESTful API Configuration This section contains the RESTful API details to define the API structure. You can test the API configuration. See Testing API Product Integration Configuration. | |||||
| URL to retrieve the information | The URL for the Web service | Yes | URL | ||
| URL Query Parameters | The parameters sent as part of the query | No | String | For https://someHostName/serviceName?username={user}, the query parameter is username. | |
| URL Path Parameters | The parameters sent as part of the path | No | String | For https://someHostName/serviceName/username, the path parameter is username. | |
| General Headers | Add (key, value) for additionally needed headers | No | String | ||
| Authentication Type | Authentication type against the web service. The options are the following:
|
Yes | Drop-down list | ||
| Alma API Configuration | |||||
| Base URL to retrieve the information | For example, https://myDomain.com | Yes | URL | https://api-na.hosted.exlibrisgroup.com/ | |
|
PeopleSoft API Configuration |
|||||
| Base URL to retrieve the information | This is the full domain and path of the PeopleSoft query, minus the query parameters. | Yes | URL | ||
| User Input Identifier | |||||
| Parameter Input Option | Either "Username", "Token Property" (from CMAuth) or "Constant" (for a static value) | Yes | Drop-down list | Username | |
| Token Property Name | Only used if "Parameter Input Option" is "Token Property" | No | String | ||
| Constant Value | Only used if "Parameter Input Option" is "Constant" | No | String | ||
| API Authentication | |||||
| Authentication Type | Authentication type against the web service. The options are the following:
|
Yes | Drop-down list | ||
|
Show Advanced Settings |
Controls the display of 'Advanced Settings', below. |
No |
Checkbox |
Unchecked |
|
|
Advanced Settings |
|||||
|
Unique Prompt Name |
For PeopleSoft, to determine the type of identifier being passed. This complements the prompt field value, which is determined by the User Identifier. |
No |
String |
EMPLID |
|
|
Row Number |
The PeopleSoft query may return more than one row. Set the row number to be used for all query responses. |
No |
Integer |
1 |
|
|
API Cache A section to control settings related to the data cache for the product integration instance. Caching is enabled by default to reduce load on the configured API server. |
|||||
| Time To Live | The length of time the cache should last for before expiring and fetching fresh data from the configured API. Dependent on the unit format set below. | No | Integer | 1 | |
| Unit Of Time | The unit of time used in combination with 'Time To Live' above. This allows customization from one hour to many weeks. | No | Drop-down list | Day(s) | |
| Cache Enabled |
Deselect to disable API caching for this instance. The integration will revert to calling the configured API every time it is opened. |
No | Checkbox | True | |
|
Last Updated Widget A section that covers configuration for last updated widget in the event the cache is enabled. |
|||||
| Enable Widget | Enables or disables the widget. Disabled by default. | No | Checkbox | No | |
| Type Of Widget | Either "Timestamp" or "Minute, Hour, Day". | No | Drop-down list | Timestamp | |
|
Timestamp Text
|
Shown if type of widget is "Timestamp".
The text pattern for the widget. %datetime% is where the date and / or time goes.
|
No
|
String
|
Last updated: %datetime%
|
|
|
Timestamp Date Format
|
Shown if type of widget is "Timestamp".
The date format for the date and / or time to be displayed on the timestamp.
|
No
|
String
|
dddd Do MMMM
|
|
|
Widget Text (Recent)
|
Shown if type of widget is "Minute, Hour, Day".
The text pattern for the widget if data was updated in the past five minutes.
|
No
|
String
|
Last updated less than five minutes ago
|
|
|
Widget Text (Less Than An Hour)
|
Shown if type of widget is "Minute, Hour, Day".
The text pattern for the widget if data was updated in the last hour. %n% is where the number goes.
|
No
|
String
|
Last updated %n% minutes ago
|
|
|
Widget Text (Hours Ago)
|
Shown if type of widget is "Minute, Hour, Day".
The text pattern for the widget if data was updated sometime in the same day. %n% is where the number goes.
|
No
|
String
|
Last updated %n% hours ago
|
|
|
Widget Text (Yesterday)
|
Shown if type of widget is "Minute, Hour, Day".
The text pattern for the widget if data was updated the previous day.
|
No
|
String
|
Last updated yesterday
|
|
|
Widget Text (Days Ago)
|
Shown if type of widget is "Minute, Hour, Day".
The text pattern for the widget if data was updated more than a day ago. %n% is where the number goes.
|
No
|
String
|
Last updated %n% days ago
|
|
|
Widget Update Frequency
|
How often the 'Minute, Hour, Day' widget update in seconds.
|
No
|
Number
|
5
|
|
|
Compact Display
|
Enabled by default, the widget is set to take up minimal screen space. Uncheck to display more prominently.
|
No
|
Checkbox
|
Yes
|
|
| Wallet Configuration | |||||
| Enable adding ID card to the Apple wallet |
Select to enable students to add their ID cards to a digital wallet |
No | Checkbox | Unselected | |
| Font Color for Apple Wallet |
Select the color in which text in the ID card should be displayed in Apple Wallet. |
No | Color Picker | #000000 | |
| Background Color for Apple Wallet | Select the background color to use for the ID card in the digital wallet. | No | Color Picker | #ffffff | |
| Description for Wallet Item | Specify a description of the ID card to display above the card in the digital wallet. | No | Free Text | None | campusM University student ID |
| General | |||||
| Default Locale | Yes | Locale code | en-gb | ||
| Link to Logo | Enter a URL for a logo file on your server or select a logo file to import. | No | URL | ||
| Alt Text for Logo | Enter alternative text to be displayed or read to users when they cannot see the logo. | Yes | Free Text | University Logo | |
| Barcode Source | Select the barcode source. Two options are available:
|
Yes | Drop-down list | ||
| Barcode Scheme | The scheme used to generate the barcode. Only used when the Barcode Source is set to Generate by app. | Yes | Drop-down list | Codabar | |
|
Get Barcode From User Identifiers |
Shown if the selected vendor is "Alma". Alma users have a list of user identifiers - check this to enable sourcing barcode data from these attribute values. |
No | Checkbox | No | |
| Alma Barcode Type | Determines which Alma attribute is used to present the barcode. This overrides Data Display under Basic Fields, below. | No | Drop-down list | Description | |
| Code | The code in the API field that refers to the barcode image URL. Also used to "Generate by app" if the vendor is "Alma". | No | String | barcode | |
| Barcode Height | Height of the generated barcode, in pixels. Does not apply if Barcode Scheme is QR Code. | No | Integer | 50 | |
| Basic Fields | |||||
|
Data Display
|
Shown if the selected vendor is "Alma".
Certain attributes in Alma have both a code value and a description. Use this to select which to display, for all relevant fields, including when setting the "Code" for User Identifiers.
|
No
|
Checkbox
|
No
|
|
| Display empty fields | Indicate if you want the field to be displayed when the API returns an empty string. The options are:
|
Yes | Drop-down list | Do not display | |
|
Picture - Take From User Identifiers |
Shown if the selected vendor is "Alma". Alma users have a list of user identifiers - check this to enable sourcing the user photo from these attribute values. |
No | Checkbox | No | |
| Picture - Code | The code of the field in the API | No | String | picture | |
| Picture - Display | The option to display or hide this field | No | Checkbox | Yes | |
| Picture - Enable Expandable Image | Select to have an expandable user image | No | Checkbox | No | |
| ID Number - Code | The code of the field in the API | Yes, if the app is generating the barcode | String | studentID | |
| ID Number - Label | The label for the student ID number
Centering an image reduces the maximum number of characters that can be displayed in the label. |
No | String | ID no. | |
| ID Number - Display | Select if you want to display the student ID number | No | Checkbox | ||
| Page Title - Code | The code of the field in the API | No | String | pageTitle | |
| Page Title - Display | The option to display or hide this field | No | Checkbox | Yes | |
| Time - Label | The label for the dynamic time field | No | String | Time | |
| Time - Display | The option to display or hide this field | No | Checkbox | No | |
| Time - Date and Time Format | Formats the display of the dynamic time field | No | String | MMMM Do YYYY, h:mm:ss a | |
| Username - Label (only for IdP Details vendor) | The label for the field
Centering an image reduces the maximum number of characters that can be displayed in the label. |
No | String | Username | |
| Username - Display (only for IdP Details vendor) | The option to display or hide this field | No | Checkbox | Yes | |
| Email - Label (only for IdP Details vendor) | The label for the field
Centering an image reduces the maximum number of characters that can be displayed in the label. |
No | String | ||
| Email - Display (only for IdP Details vendor) | The option to display or hide this field | No | Checkbox | Yes | |
| Name - Label (only for IdP Details vendor) | The label for the field
Centering an image reduces the maximum number of characters that can be displayed in the label. |
No | String | Name | |
| Name - Display (only for IdP Details vendor) | The option to display or hide this field | No | Checkbox | Yes | |
| Custom Fields | |||||
| Code | The code of the field in the API | Yes | String | ||
| Label | The label of the field
Centering an image reduces the maximum number of characters that can be displayed in the label. |
Yes | String | ||
| Display if Empty | Select if you want to display the custom field if the field is empty | No | Checkbox | ||
| Display in Wallet |
Select if you want to display the custom field in a digital wallet This field has no effect if the digital wallet feature is not enabled (see Wallet Configuration, above). |
No | Checkbox | Not selected | |
| Look and Feel | |||||
| Primary Theme Color | Select a color for the main elements on the page | No | Color Picker | #444444 | |
| Secondary Theme Color | Select a color for the secondary elements on the page | No | Color Picker | #6f8ea4 | |
| Background Color | Select a color for the background of the page | No | Color Picker | #ffffff | |
| Text Color | Select a color for the text on the page | No | Color Picker | #000000 | |
| Logo Orientation | Select where the logo should be positioned | No | Drop-down list | Top Right | |
| Image Orientation | Select where the image should be positioned | No | Drop-down list | Top Center | |
| Text/Labels | |||||
| Error Message | Message to display when there is an error retrieving the data. | No | String | Unable to reach the service at this time. Please try again later | |
| Import/ Export Configuration You can configure the product integration and then export it to another campusM environment, for example, from sandbox to production or from preview to production. | |||||
| Import your File Here | Select Choose File to select a file to import data | No | Button | ||
| Export | Create a JSON file with all product integration configurations. | No | |||
| Import | Use this option to load configuration from JSON of an exported product integration. | No | |||
Digital Wallet Support
You can enable end-users to add their ID cards to the digital Apple Wallet. If you choose to enable this feature, you can also control certain aspects of the way the ID cards are displayed in the digital wallets, such as the background color of the ID card and which Custom Fields are included.
Apple Wallet
The digital wallet displays basic information about the user on the front of the ID card. Apple Wallet displays up to five fields – primary and secondary fields, and three additional fields. More fields can appear on the backs of the cards.
The following items are displayed in the digital wallet if they are configured to be displayed in the ID Card page in App Manager:
- Barcode or QR code (General > Barcode Source)
- Logo (General > Link to Logo)
- User's picture (Basic Fields > Picture)
- User's ID number (Basic Fields > ID Number)
Wallet Restrictions
The following restrictions apply to the configuration of ID Cards where customers wish to enable the Digital Wallet:
- The user's image MUST be configured as a URL (starting with "http...").
- Only QR codes or Barcode of format Code 128 are supported by the Wallet
- The total number of fields (IdP fields and custom fields) that can be configured to be displayed on the card must not be greater than 10
- The header title for the card in the wallet will initially default to the field 'Page Tile'. If this field is blank, then the 'Screen Title' will be used.
ID Card Features in Apple Wallet
On the front of the ID card in Apple Wallet, up to five fields can be displayed: a primary field, a secondary field, and up to three auxiliary fields. If the ID card is configured to display more than three additional fields in digital wallets, they are displayed on the back of the ID card. Up to ten fields can appear on the back of the ID card.
- Primary field – The student's ID number and ID label
- Secondary field – If the vendor is IdP, and Display in Wallet is selected under General > Username, the label specified in App Manager for the Username field is displayed, followed by the user's name (which comes from the vendor). For all other vendors, and for IdP when Display in Wallet is not selected for Username, nothing is displayed for the secondary field.
- Auxiliary fields and backfields – Additional fields for which Display in Wallet is selected in App Manager appear on the front (up to three fields) and back of the card in the digital wallet. IdP fields are given priority for display over custom fields.
User Experience
User's can easily add their ID cards to their digital wallets from campusM by selecting the Add to Wallet button in the ID Card page.
Page tags: article:topiccontent:Documentationproduct:campusmlang:english