You can configure Vega to connect and communicate with the following third-party applications:
- Axis 360
- BorrowBox
- cloudLibrary
- Content Café
- Google Books
- Hoopla
- OverDrive
- PayPal Payflow or other payment system
- You can use either PayPal or another payment system to enable patrons to pay fines online.
- For more information, see Configure PayPal to process fines and fees.
- Syndetics Classic
- Syndetics Unbound
- Econtent vendors (See Configure econtent management.)
- Rapido
- Dibiost
- WorldCat
For information on administration of third-party accounts, contact the provider.
Vega uses either Google Books, Syndetics Classic, Syndetics Unbound, or Content Café to display book covers. If you enable one, Vega automatically disables the others. By default, Vega uses Google Books.
If you enable Syndetics Classic, Vega also displays author biographical information (if available) on the Person page. If you enable Syndetics Unbound, Vega displays the following:
- Book covers
- Author biographical information and author images on the Person page
- Showcases that include persons and bookmarked authors in Bookmarks.
You can configure econtent APIs for Axis 360, cloudLibrary, BorrowBox, Hoopla, and OverDrive to load econtent records directly into the Vega context engine instead of manually loading and cataloging the records in your ILS. For more information, see Configure econtent management.
In phase one of implementing this feature, we recommend that you use a vendor’s API to provide records directly to Vega only if you are comfortable with the following:
- Loading the entire subscription into your Vega Discover context engine.
Note that the Hoopla catalog contains over 1.5 million records.
- The level of cataloging detail provided by the vendor.
Loaded records cannot be individually updated like they can in the ILS. Some titles may not roll up with works based on vendor-provided data. - ILS-cataloged copies of matching title IDs from vendor subscriptions will appear instead of the API-ingested record.
- You can use this feature to correct record metadata.
- You don't need to delete your current ILS econtent records before you load records via the APIs, and you can take your time to remove ILS copies of econtent records.
Prerequisites
-
Before you configure third-party connections for econtent vendors such as OverDrive, Hoopla, Dibiost, cloudLibrary, Axis 360, and BorrowBox, you must configure econtent mapping. For more information, see Configure econtent mapping.
-
If you use a vendor API to load econtent records directly into Vega Discover, you must configure format mappings for that vendor.
Format mappings determine how vendor-specific formats display in Vega Discover. Map each vendor format to an available Material Type or Type of Material from your ILS. If a new Material Types or Type of Material is required, use the Synchronize ILS codes settings to pull in your new Material Types or Type of Materials so that they will appear in the Format Mapping as an option.
 To configure Axis 360
- From the Settings menu, select Third-party connections.
The Third-party connections configuration page opens. - Select the Configure button for Axis 360.
The Edit connection page opens. - Enter the following information:
- Library ID
- Username
- Password
- (Optional) If you want to use the Axis 360 API to load econtent records directly into the Vega context engine, select Use API to provide records directly to Vega.
- (Optional) If you want to upload a custom logo, do the following:
- Select Upload Logo.
- Select the logo you want to use.
- Select Open.
- Select Save.
To configure BorrowBox
- From the Settings menu, select Third-party connections.
The Third-party connections configuration page opens. - Select the Configure button for BorrowBox.
The Edit connection page opens. -
Enter the following information:
- Library ID
- Username
- Password
- (Optional) If you want to use the BorrowBox API to load econtent records directly into the Vega context engine, select Use API to provide records directly to Vega.
- (Optional) If you want to upload a custom logo, do the following:
- Select Upload Logo.
- Select the logo you want to use.
- Select Open.
- Select Save.
To configure cloudLibrary
- From the Settings menu, select Third-party connections.
The Third-party connections configuration page opens. - Select the Configure button for cloudLibrary.
The Edit connection page opens. -
Enter the following information:
- Library ID
- Username
- Password
- (Optional) If you want to use the cloudLibrary API to load econtent records directly into the Vega context engine, select Use API to provide records directly to Vega.
- (Optional) If you want to upload a custom logo, do the following:
- Select Upload Logo.
- Select the logo you want to use.
- Select Open.
- Select Save.
To configure Content Café
- From the Settings menu, select Third-party connections.
The Third-party connections configuration page opens. - Select the Configure button for Content Café.
The Edit connection page opens. - Enter your user ID and password.
- Select Use Content Café for Book Covers & Content Enrichment.
- Select Save.
To configure Google Books
- From the Settings menu, select Third-party connections
The Third-party connections configuration page opens. - Select the Configure button for Google Books.
The Edit connection page opens. -
Select Use Google Books for Book Covers & Content Enrichment to enable Google Books.
- Select Save.
To configure Hoopla
- From the Settings menu, select Third-party connections
The Third-party connections configuration page opens. - Select the Configure button for Hoopla.
The Edit connection page opens. -
Enter the following information:
- Library ID
- Username
- Password
- (Optional) If you want to use the Hoopla API to load econtent records directly into the Vega context engine, select Use API to provide records directly to Vega.
- (Optional) If your library purchases Hoopla Subscriptions that are configured at the site level, select Suppress Hoopla records from Main Site to hide Hoopla content from the Main Site and display it only on the sites with active subscriptions.
- (Optional) If you want to upload a custom logo, do the following:
- Select Upload Logo.
- Select the logo you want to use.
- Select Open.
- Select Save.
Enabling this feature will schedule an ingest of ALL content in your Hoopla subscription into Vega Discover. Don’t select this option unless you want to load all Hoopla records into Vega Discover.
If you select this option and save your changes, Vega deindexes content from the Main Site. If you clear this option and save, Vega reindexes the content into the Main Site. It may take several minutes before the updated indexing is reflected in the Main Site or Vega Discover.
To configure OverDrive
Configure your main OverDrive subscription in Vega Discover before loading OverDrive records. You can load OverDrive collections directly into Vega Discover or your ILS catalog:
- From the Settings menu, select Third-party connections.
The Third-party connections configuration page opens. - Select the Configure button for OverDrive.
The Edit Connection page opens. -
Enter the following information:
- ILS name
- Library ID - This field must only contain digits.
- Website ID
- (Optional) Advantage account ID
If you plan to load all content into the ILS, enter the OverDrive Advantage account ID that your library purchases in this field.
This Advantage ID collection will not be ingested directly into Vega Discover. You need to manually load any Advantage Collection materials for this Account ID directly into your ILS; otherwise, they will not appear in Vega Discover.
- Select from the following patron authentication types:
- Patron Barcode (Most Polaris libraries use this authentication type.)
- Patron ID (Many Sierra libraries use this authentication type.)
- (Optional) If you want to use the OverDrive API to load econtent records directly into the Vega context engine, select Use API to provide records directly to Vega.
- (Optional) If you want to upload a custom logo, do the following:
- Select Upload Logo.
- Select the logo you want to use.
- Select Open.
- Select Save.
If you don't know which authentication type your library uses to send API transactions to OverDrive, contact OverDrive support.
Configure multiple OverDrive Advantage IDs
If your library belongs to a consortium or manages several OverDrive Advantage accounts, you can configure all related Advantage IDs so Vega Discover can ingest their titles. These can be accounts your library purchased directly or those shared with you by other libraries.
This configuration creates record extraction jobs for each Advantage ID. The jobs ingest the collection's materials into your Vega catalog.
Do not add an Advantage account ID in the main OverDrive configuration. It will not create a record extraction job and cannot be ingested directly into Vega Discover.
-
Complete the main OverDrive connections setup first, and make sure you selected Use API to provide records directly to Vega in the earlier steps.
-
In the Add Advantage Account ID field at the bottom of the Edit Connection page, enter one Advantage ID.
-
Select +Add Advantage Account ID to save it.
-
Repeat steps 2-3 for each additional Advantage ID you want to include.
After configuration, Vega Discover schedules record extraction for all Advantage IDs. Any titles not included in your main subscription are added. The new titles will display the availability status to authenticated patrons depending on their access to the configured Advantage accounts. Titles from your subscription that also have additional Advantage copies from a subscription will allow circulation of Advantage copies when other copies are unavailable.
Advantage ID collections you enter at the main library third-party connections level are ingested to all sites that share the main-level configuration. Advantage ID collections you enter at the site level are only ingested to the particular site.
If you don’t want to ingest the main OverDrive collection through the APIs, contact Support for assistance to configure only Advantage extractions.
Share OverDrive Advantage collections
-
In the upper-right corner, select Settings
 .
. -
From the Settings menu, select Library defaults.
-
Select Additional Advantage Accounts Management.
-
Select Edit Sharing.
-
(Optional) Do the following:
- Search by site name box.
- Search by connection name box.
-
For each site that you want to share OverDrive Advantage with, select Shared.
-
Select Save.
| If you want to search by | Enter a name in the |
|---|---|
| Site name |
|
| Connection name |
|
To configure Syndetics Classic
- From the Settings menu, select Third-party connections.
The Third-party connections configuration page opens. - Select the Configure button for Syndetics Classic.
The Edit connection page opens. - In the Client key field, enter the Syndetics Classic client key.
-
Do one of the following:
-
To enable Syndetics Classic, select Use Syndetics Classic for Book Covers & Content Enrichment.
- To disable Syndetics Classic, clear the Use Syndetics Classic for Book Covers & Content Enrichment checkbox.
-
- Select Save.
To configure Syndetics Unbound globally
- From the Settings menu, select Third-party connections.
The Third-party connections configuration page opens. - Select the Configure button for Syndetics Unbound.
The Edit connection page opens. - Select the features that you want to appear on the Resource page:
- Other Books in the Series
- Reader Reviews
- Professional Reviews
- You May Also Like
- Book Profile
- Reading Level
- Awards
- About the Author
- Excerpt Preview
-
Do one of the following:
-
To enable Syndetics Unbound, select Use Syndetics Unbound for Book Covers & Content Enrichment.
- To disable Syndetics Unbound, clear the Use Syndetics Unbound for Book Covers & Content Enrichment checkbox.
-
- Select SAVE.
To configure Syndetics Unbound for a specific site
- In the upper-right corner, select Settings .
- From the Settings menu, select Library defaults.
- Select Site Configuration.
The Sites page opens. - From the Actions column, select Options
 > Edit for the site you want to configure.
 - Select Third-party connections.
- Next to Syndetics Unbound, select Configure.
-
Do one of the following:
If you want to Do this Select the features that you want to appear on the Resource page: - Select the Use Syndetics Unbound for Book Covers & Content Enrichment checkbox.
- Clear the Use Global Settings checkbox.
- Select from the following:
- Other Books in the Series
- Reader Reviews
- Professional Reviews
- You May Also Like
- Book Profile
- Reading Level
- Awards
- About the Author
- Excerpt Preview
Use the global settings - Clear the Use Syndetics Unbound for Book Covers & Content Enrichment checkbox.
- Select the Use Global Settings checkbox.
- Select SAVE.
To configure Rapido CB ILL
- From the Settings menu, select Third-party connections.
The Third-party connections configuration page opens. - Select the Configure button for Rapido.
The Edit connection page opens. - (Optional) If your library is a part of a Rapido Pod:
- Select the Add Pod button.
- Provide the Pod Name and POD ID to connect to your Rapido pod.
- Provide the following information for your library's Rapido Connection:
- Rapido API Base URL
- Rapido Key
- Rapido Secret
- In the Availability Details Configuration section, configure the Availability Institution details and Availability Pod Configuration details provided to you by Rapido.
These settings enable availability information to be displayed in Vega Discover Rapido search results. - Click Save.
To configure Dibiost
Dibiost provides a limited integration with Vega Discover with the following behavior and constraints:
-
Only eBooks and eAudiobooks are loaded into Vega Discover.
Other econtent formats included in the Dibiost subscription aren't ingested. -
MARCXML records are side-loaded directly from Dibiost into Vega Discover.
Dibiost can be configured at the main site level for single library systems. In consortia and multi-library systems, Dibiost can be configured at the main site level and shared to participating sites, or configured at the site level for each library that purchases an individual subscription to Dibiost.
-
From the Settings menu, select Third-party connections.
The Third-party connections configuration page opens. -
Select the Configure button for Dibiost.
The Edit connection page opens. -
Request the following information from Dibiost for your subscription, then provide it in the corresponding fields:
-
Library ID
-
Library key
-
Username
-
Password
-
-
Select Use API to provide records directly to Vega.
This option is required for the Dibiost configuration to function. -
In the Vendor Format Mapping section, map each Dibiost format to an ILS material type:
-
eBook - select the corresponding ILS material type for eBooks.
-
eAudiobook - select the corresponding ILS material type for eAudiobooks.
-
Default - select an ILS material type to use for any unexpected or unsupported formats.
-
-
Save the configuration.
When Dibiost is configured, Vega Discover loads MARCXML records directly from Dibiost into Vega Discover.
Patron experience
-
For authenticated patrons, Vega displays currently circulating Dibiost materials in Checkouts & Requests.
Dibiost doesn't provide Vega with information on holds and requests. -
When a patron selects Check Availability for a resource in the Catalog, Vega submits an availability request to Dibiost.
-
If access is available, the patron is redirected to the record in Dibiost in a new tab, and authenticated automatically.
-
If access isn't available, the patron is redirected to the record in Dibiost without authentication.
-
To configure WorldCat
This connection allows libraries that have an active WorldCat Discovery (WCD) subscription to allow patrons and/or staff to browse WCD materials in order to place interlibrary loan (ILL) requests into the Sierra or Polaris ILL queues for review by an interlibrary loan librarian for fulfillment.
This interlibrary loan feature using WCD can be configured at the Main and/or Site level. When configured at the Main Site level, this integration is automatically inherited by sites and can be disabled.
Prerequisites:
-
Make sure your library has an active WCD subscription.
-
Submit the OCLC Mutual Customer Access Authorization Form to legal@oclc.org so that they can enable the WCD Search API access for this integration.
Procedure:
- From the Settings menu, select Third-party connections.
The Third-party connections configuration page opens. - Select the Configure button for WorldCat.
The Edit connection page opens. - In the Reg ID field, enter your WCD registration ID.
- (Optional) To allow authenticated users to submit ILL requests from WCD results, enable Allow ILL Hold Requests.
When enabled, a Request button is displayed for WCD search results. When disabled, users can search WCD materials, but can't submit requests. - (Optional) To restrict access to WCD searching and requesting to staff members only, select Display for Staff Users Only.
When enabled, only authenticated staff users can access the WCD search. Staff can use Patron Assist to place requests on behalf of patrons. - If you're configuring the connection at the Member Library Collection Site level, do one of the following:
- Leave Use Global Settings selected to inherit the Main Site configuration.
- Clear Use Global Settings to configure a separate WCD connection for the site.
- Select Save.
WorldCat patron experience
When the Interlibrary Loan using the WCD feature is enabled through the WorldCat third-party configuration, authorized users can select Search from WorldCat from the top of the Search Results page to run their current search directly in the WorldCat Discovery Catalog within Vega Discover.
The Search WorldCat label can be customized in the Localization Strings.
-
The WCD search results can be filtered by Date, Format, Persons, and Language.
-
Only one Person filter and one Format filter can be selected at a time.
-
Search results can be sorted.
-
Users can select Edition Information to view additional edition details.
When viewing WCD materials in Vega Discover, users see a message indicating that they are browsing ILL materials and can return to their local catalog using the Return to catalog button in the upper-right corner of the Search Results page.
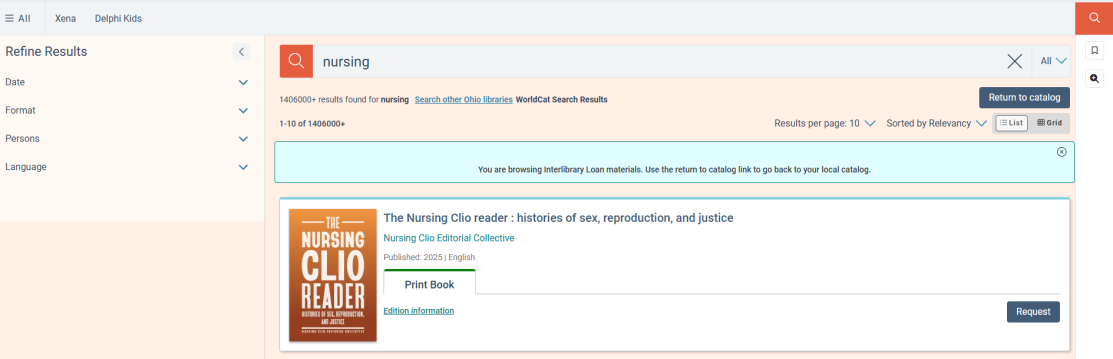
If ILL hold requests are enabled, a Request button is displayed for each title in the search results.
The Return to catalog and Request labels can also be customized in the Localization Strings.
-
Selecting Request submits an ILL request to the ILS ILL request queue.
-
Requests are placed in the selected Pickup Branch's queue in Polaris.
-
Any blocks or limits on a patron prevent request creation and result in an error.
The request data sent to the ILS includes: Title, Author, ISBN/ISSN/LCCN, OCLC number, Edition, Publisher, Format and Date information, if available from WCD.
About collection site-level payment configuration
If your library uses a single payment account across all branches or collection sites for processing patron fine payments, you should configure fine payment at the Vega Discover level. If any branches or collection sites use a separate payment account for processing patron fine payments, you can configure that fine payment account at the consortia collection site- or kiosk-level.
If there is no consortia collection site- or kiosk-level fine payment configuration, the collection sites or kiosks use the Vega Discover-level fine payment account.
To configure PayPal Payflow or other payment system (Vega Discover-level)
- From the Settings menu, select Third-party connections.
The Third-party connections configuration page opens. - Select the Configure button for Fine Payment.
The Edit connection page opens. - Select one of the following:
- PayPal Payflow
- Other
- Do one of the following:
- In the User field, enter one of the following:
- If you set up one or more additional users on the PayPal account, enter the ID of the user who is authorized to process transactions.
- If you did not set up additional users on the PayPal account, enter the same merchant login ID that you enter in the Vendor field below.
- In the Partner field, enter PayPal or the ID that an authorized PayPal reseller provided to you.
- In the Vendor field, enter your merchant login ID created when you registered the PayPal account.
- In the Password field, enter the password you defined when you created the PayPal account.
- Select a template from the list.
- In the Payment URL field, enter the URL provided by the payment service provider.
- In the Payment Button Text field, enter the text that you want to appear on the payment button. For example, Pay Fines.
| If you selected | Do this |
|---|---|
| PayPal Payflow |
|
| Other |
|
- (Optional) In the Minimum Payment box, enter the minimum payment that patrons must pay.
The value you enter must be a whole number. If you don't enter a value, Vega accepts any amount. - (Optional) In the Payment Note box, enter information that you want to display to patrons.
If you enter text, a question mark icon appears next to the payment button. Patrons can select the icon to see the text.
Example:
Please allow up to 24 hrs for payments to be processed.
- Select Save.
To configure PayPal Payflow or other payment system (collection site- or kiosk-level)
- In the upper-right corner, select Settings .
- Select Library defaults > Site Configuration.
- In the Actions column, select Options > Edit for the collection site or kiosk that you want to configure.
- Select Third-party connections.
- Next to Fine Payment, select Configure.
- Select one of the following:
- PayPal Payflow
- Other
- Do one of the following:
- In the User field, do one of the following:
- If you set up one or more additional users on the PayPal account, enter the ID of the user who is authorized to process transactions.
- If you did not set up additional users on the PayPal account, enter the same merchant login ID that you enter in the Vendor field below.
- In the Partner field, enter PayPal or the ID that an authorized PayPal reseller provided to you.
- In the Vendor field, enter your merchant login ID created when you registered the PayPal account.
- In the Password field, enter the password you defined when you created the PayPal account.
- Select a template from the list.
- In the Payment URL field, enter the URL provided by the payment service provider.
- In the Payment Button Text field, enter the text that you want to appear on the payment button. For example, Pay Fines.
- (Optional) In the Minimum Payment box, enter the minimum payment that patrons must pay.
- (Optional) In the Payment Note box, enter information that you want to display to patrons.
- Select Save.
| If you selected | Do this |
|---|---|
| PayPal Payflow |
|
| Other |
|
The value you enter must be a whole number. If you don't enter a value, Vega accepts any amount.
If you enter text, a question mark icon appears next to the payment button. Patrons can select the icon to see the text.
Example:
Please allow up to 24 hrs for payments to be processed.
Delete a third-party connection
You can delete all third-party connections except Google Books.
To delete a third-party connection
- From the Settings menu, select Third-party connections to open the Third-party connections configuration page.
- Select the Configure button for the connection you want to delete.
The Edit connection page opens. - At the bottom of the page, select the trash can
 .
.
